Education NFTs
Education Decentralized
Hiring Revolutionized
Learning Galvanized
Copyright. Beau Brannan 2024
RETIRED INSTRUCTIONS, IF YOU STUMBLED ONTO HERE WELCOME!
GETTING ON THE SAME PAGE
After introducing the concept to your students, ask for a student or group of students if they will act as a liaison or ambassador for all the students in the class. Their responsibility is to create a unique image the class is proud of, mint that image as an NFT with your teacher effectiveness score embedded* and then transfer it to you at the end of the course.You may also decide to let the class design the NFT they will receive as well. Some teachers may prefer to make it themselves.*Embedding a score does not currently have a universally accepted method. The suggested and simple method is to simply have each student rate whether or not you, the teacher, delivered the course syllabus as promised. This would be a "trinary" rubric of: Exceeded, Met, or Needs Improvement. Each of these takes a point value of 1.25, 1 and .75 respectively. Add up each student’s vote anonymously and divide by the amount of students in the class to come to an effectiveness average. This is simply to allow for students to have ownership in this experience. This is not a replacement for course evaluations or any other feedback, but a simplified way to evaluate the experience. This also helps build teacher credibility online.With all this in place, the end of the course approaching, and an image designed, here is how to mint!
MINTING & TRANSFERRING YOUR NFT IN 12 STEPS
Step 1: go to opensea.io using Google Chrome
Step 2: on the far top right you will see a wallet icon. Click on it and then click on "MetaMask" with the Fox icon.
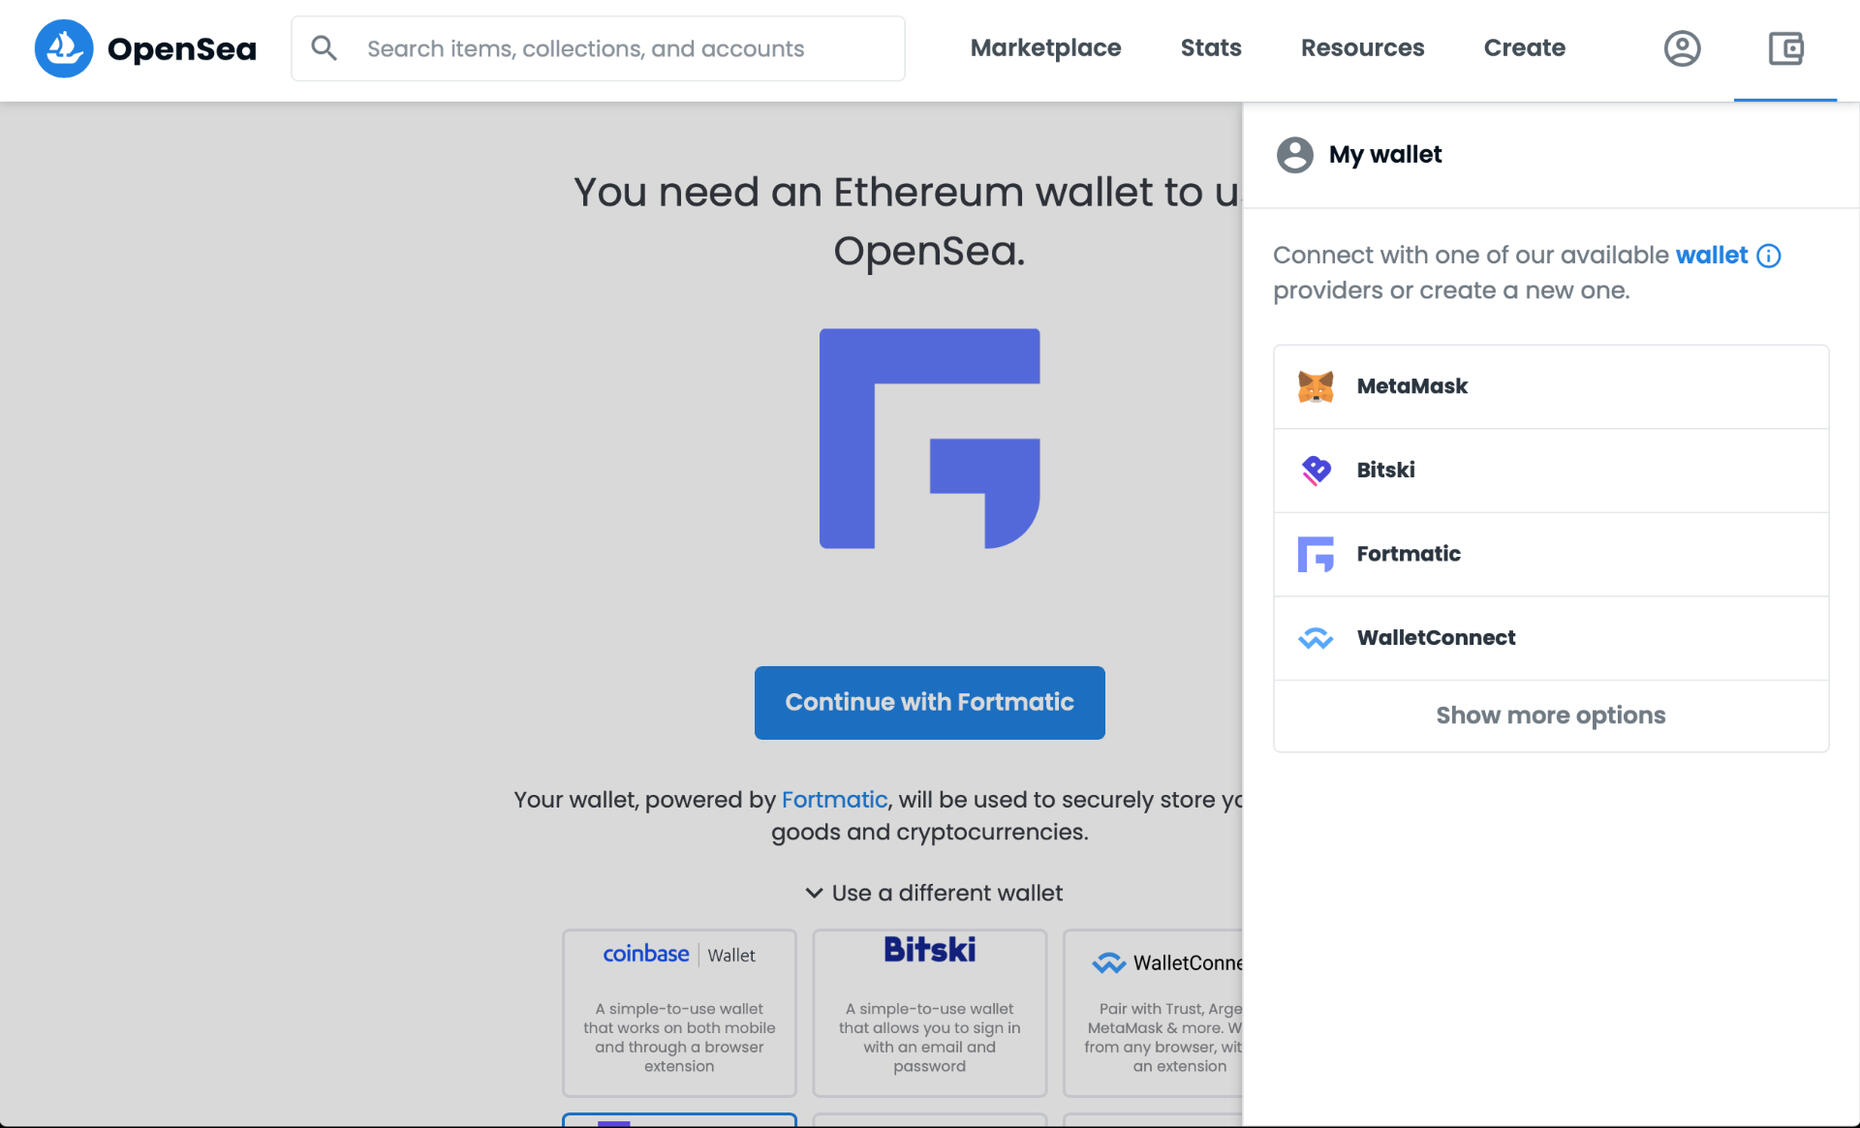
You will be taken to a page to add a Chrome Extension (hence you will need to be using a Google Account). Go ahead and download the extension.
Step 3: Once the MetaMask extension is installed, it is time to create an account. Click the extension puzzle piece on Google Chrome (located to the right of the search bar) and select MetaMask. You will be asked a question:
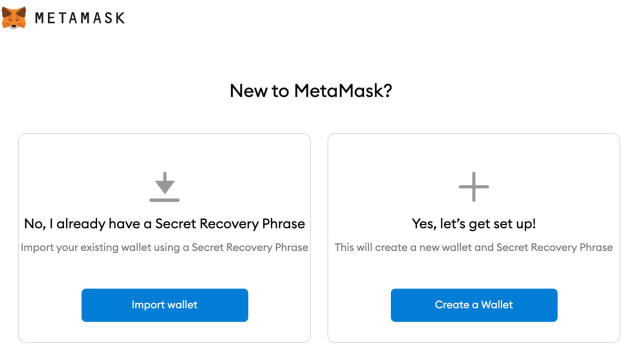
Step 4: Go ahead and click “Yes, let’s get set up!” And click the “Create a Wallet” button. MetaMask will walk you through all the steps easily.NOTE: While there is a password, pay attention to the secret 12 word phrase. Treat this like a social security number. Write it down and do not lose it!!!
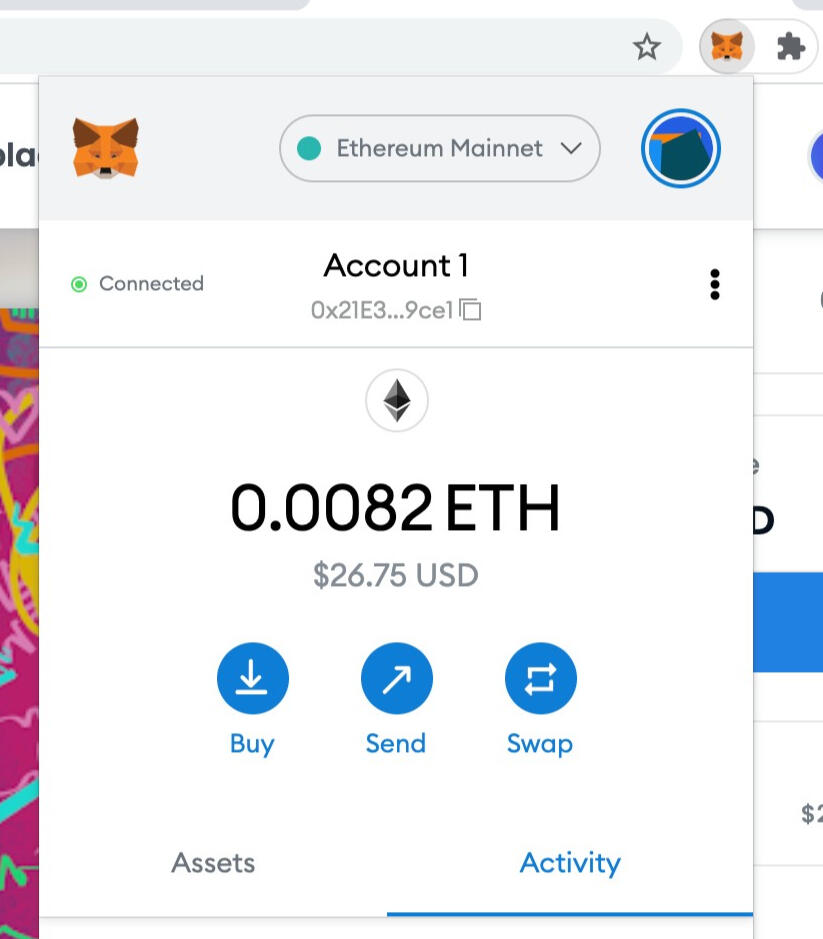
Step 5: At some point you will need to fund your wallet to transfer NFTs. If you already have crypto holdings on Coinbase or Binance, then you can easily transfer ETH to your wallet now that you have the address (at the top of the MetaMask extension).If you have never bought cryptocurrency before, you are able to fund your wallet by simple clicking the "buy" button. You will be connected to a third-party to buy with a credit or debit card. Note: You will see an option to fund in Opensea using Moonpay, we suggest you stay within MetaMask & use Wyre.
How much should I fund?
Since we will use the Polygon network, budget very conservatively at 25 cents a student. So if you have 30 students, $7.50 worth of ETH or Ethereum would be plenty.
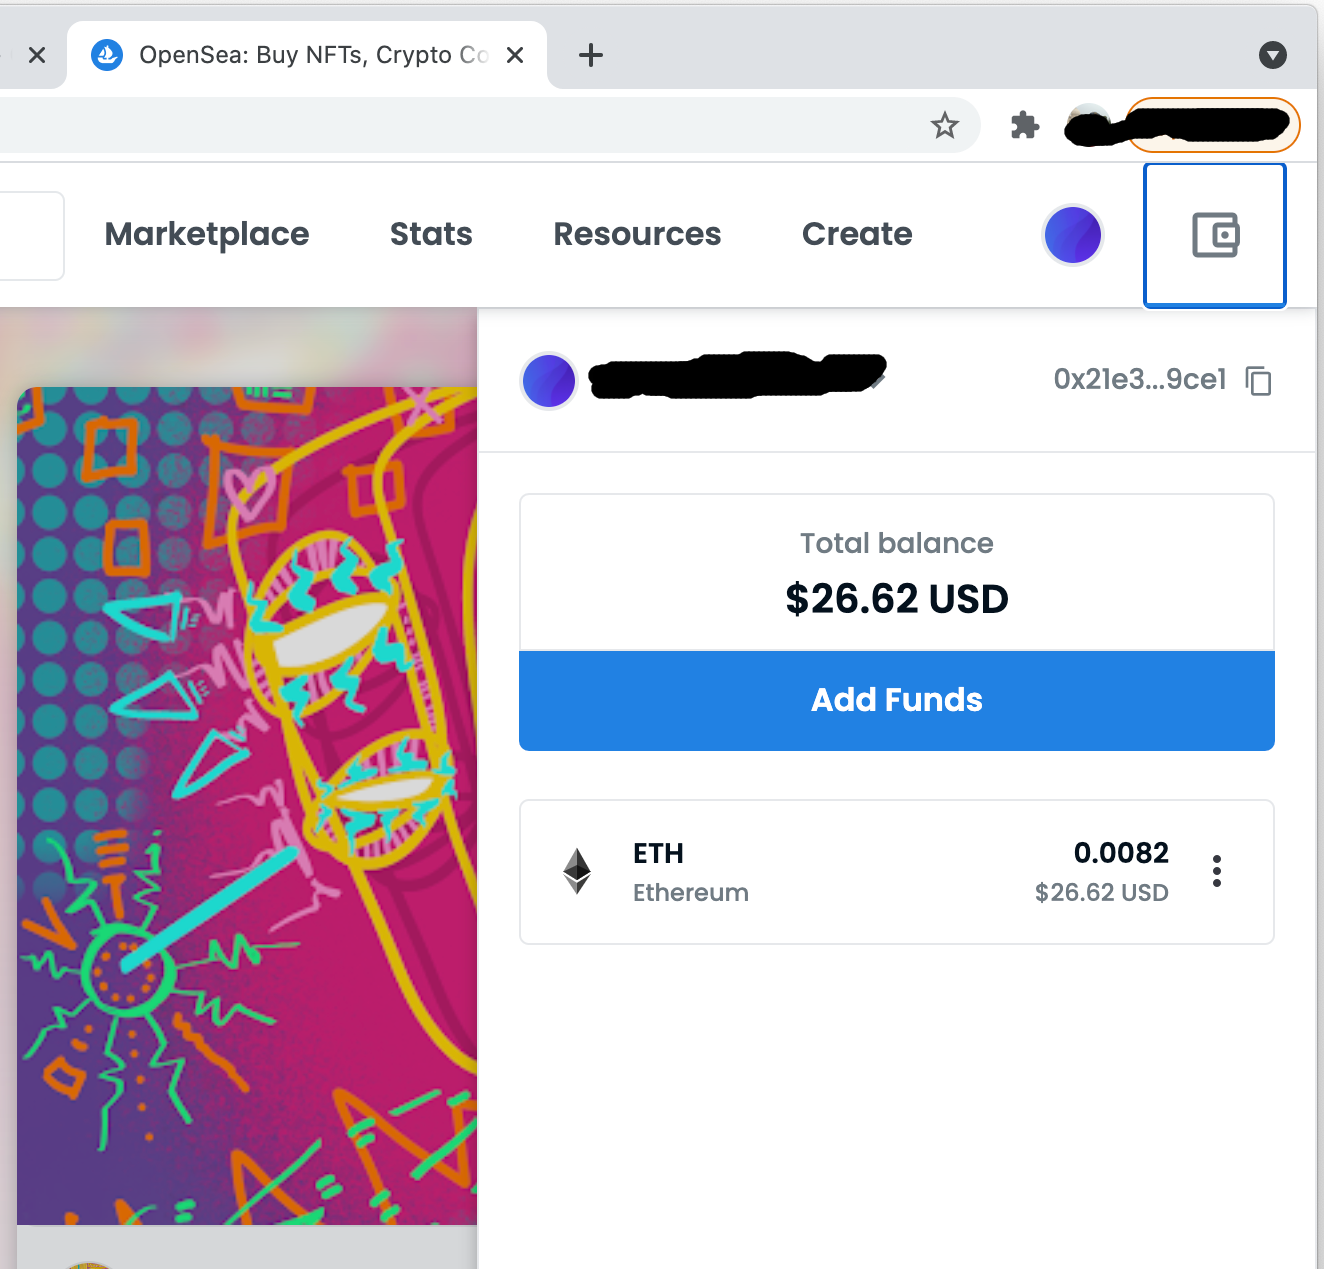
Step 6: Once you are all set up, head back over to opensea.io and connect your wallet to OpenSea (if it isn’t already). Do this by clicking on the wallet icon on the far right again.You will notice your default cryptocurrency is Ethereum (ETH). Since the most economically viable chain and currency as of writing is MATIC on Polygon, you will need to create a bridge or chain which allows these two networks to talk.
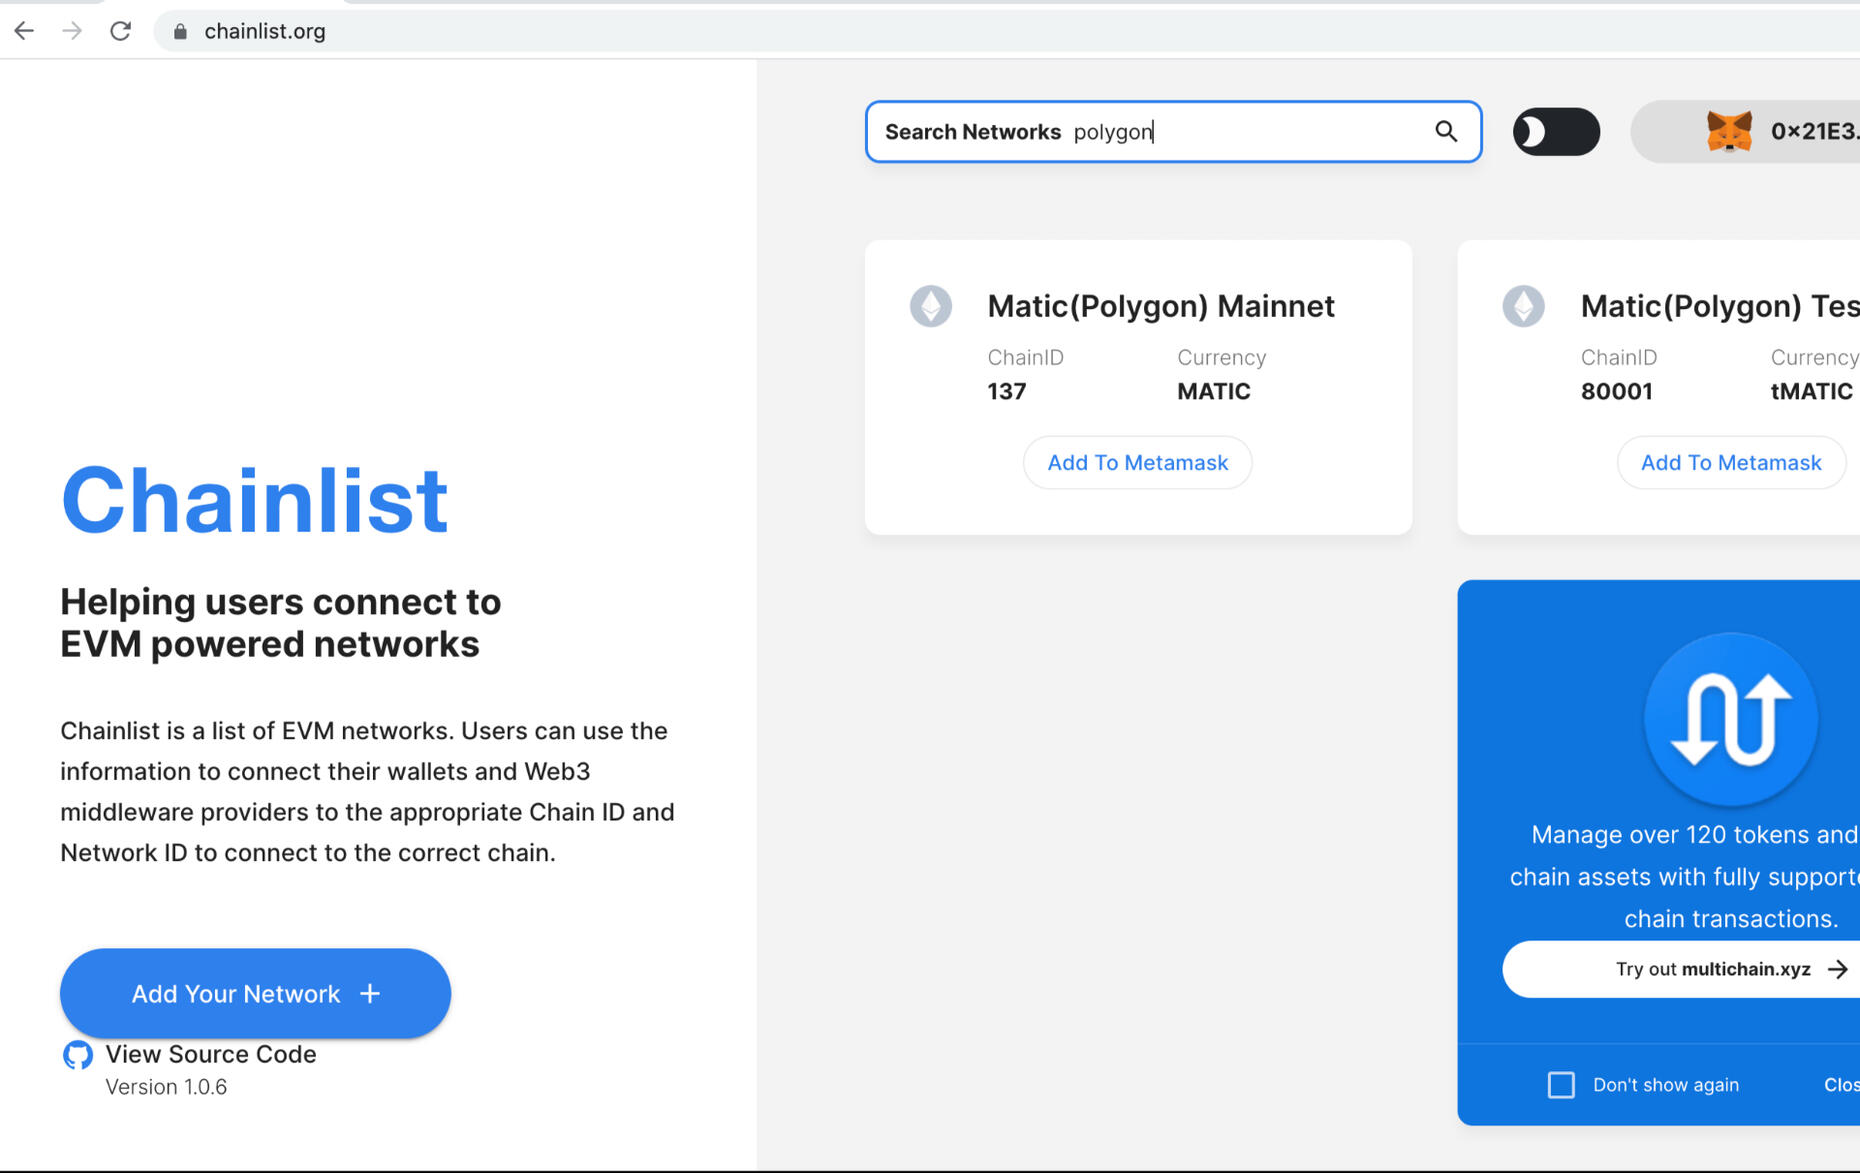
Step 7: Go to https://chainlist.orgMake sure your MetaMask wallet is connected. Do so by clicking "Connect Wallet"In the search bar type "polygon" and Matic (Polygon) Mainnet will appear. Click “Add to Metamask.”
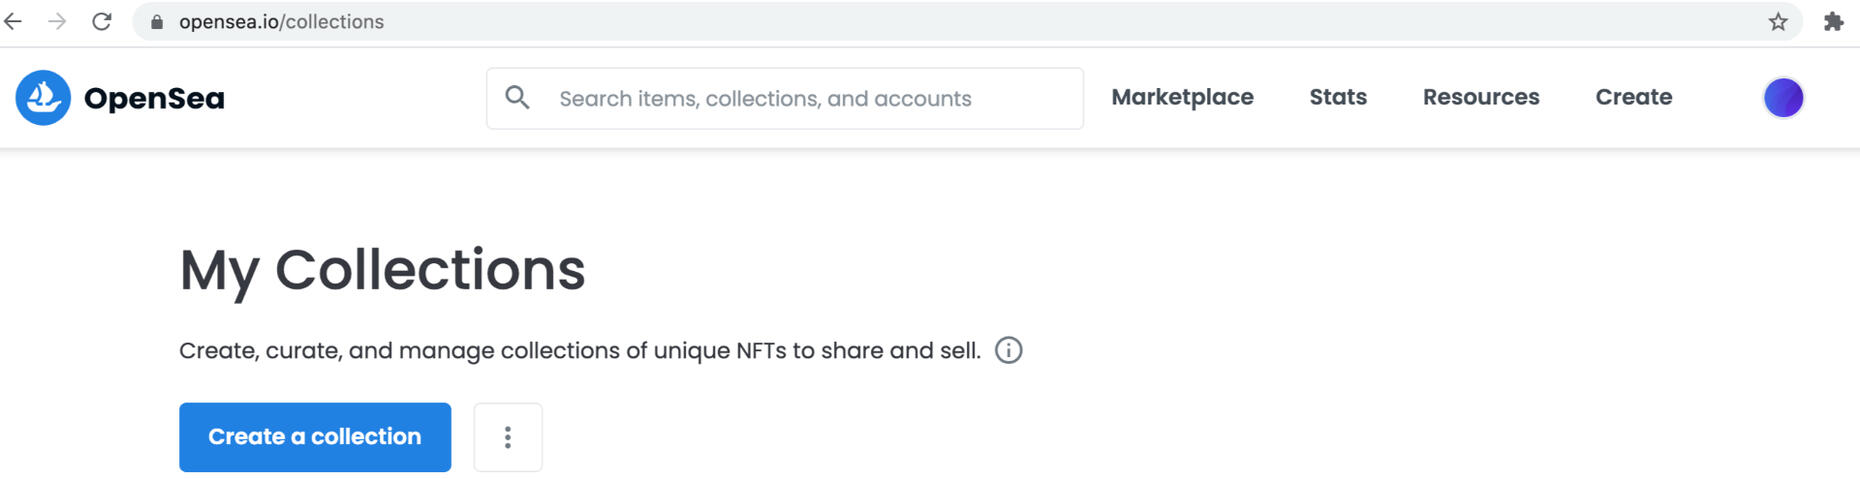
Step 8: Now it is time to create your Education NFT collection. Head back to Opensea.Click on your profile or the circle icon next to the wallet icon on OpenSea and select "My Collections"On that page, click the "Create A Collection" button.
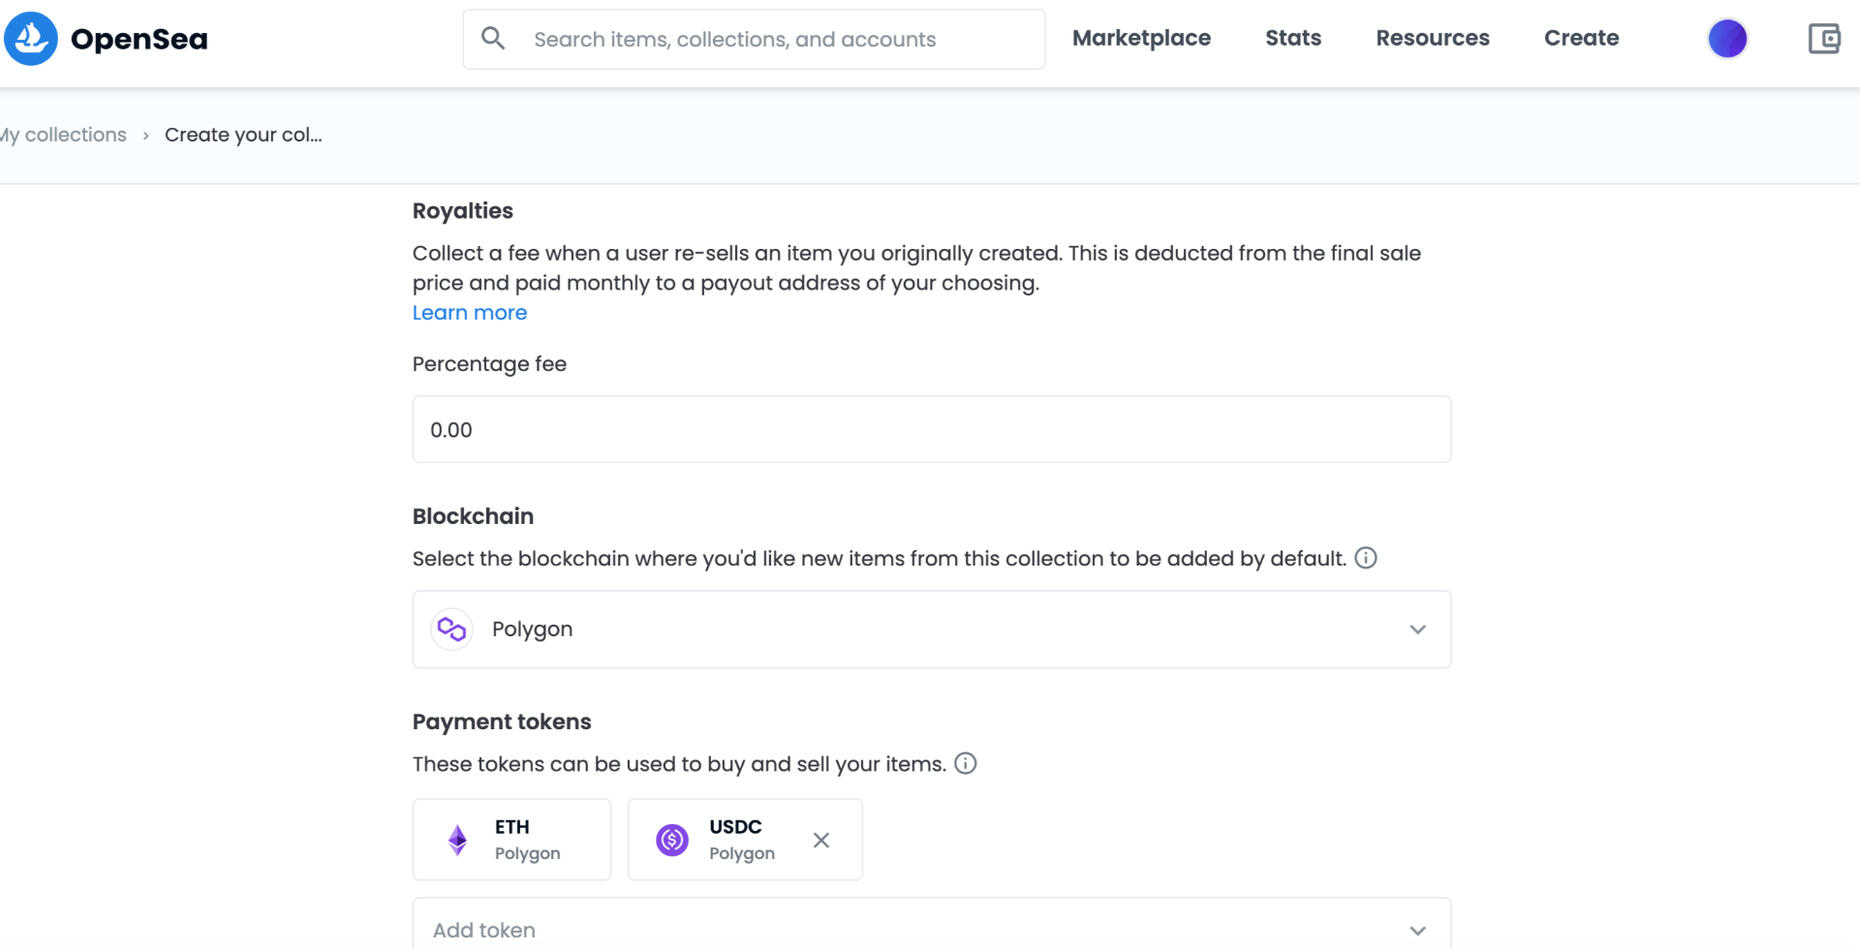
Step 8: Create a CollectionOn the page, you will be asked to complete some information for your collection. Note, this is not the NFT itself but a place to organize it.For instance, you may want to create a collection for all the classes you will teach from here on out. You may also want to create collections based on the class topic. Perhaps you teach Biology and Chemistry and so you create a collection for each. Or as mentioned you just have one Education NFT collection.Below is a walkthrough of what to consider/include:For Logo Image: if this is one collection for all your education NFTs, perhaps your avatar or profile picture is helpful. If it is for a course or series, then create a new icon or just use one of the NFT images you made.As indicated, the Featured and Banner images are optional.Name: Depending on how you use this collection will determine the Name of the Collection. Again, if this is one collection for all NFTs, consider using your name. If this collection is specific to a course or series then use that. Note: Collection names need to be unique. In other words you cannot have two collections on OpenSea called “Science Class.”URL: Optional, you can also include your own personal site.Description: Any description of this collection or clarifying what this collection will hold.Category: This is not necessary to select, but the closest would be UtilityLinks: Any links to your teaching profiles or class social accounts, etc. Not necessary to complete.Royalties: Leave at 0.00
Blockchain: IMPORTANT! Select Polygon from the dropdown, NOT Ethereum. If Polygon doesn’t appear, go back to step 7 to ensure Polygon is associated with your MetaMask wallet.Payment Tokens: Not a big deal, but we recommend you also add USDC Polygon. This allows for a stablecoin option.
Display Theme: Your choice, the default works greatAnd hopefully your class image NFT is not explicit :)
It defaults as unchecked so leave it.Click CREATE!
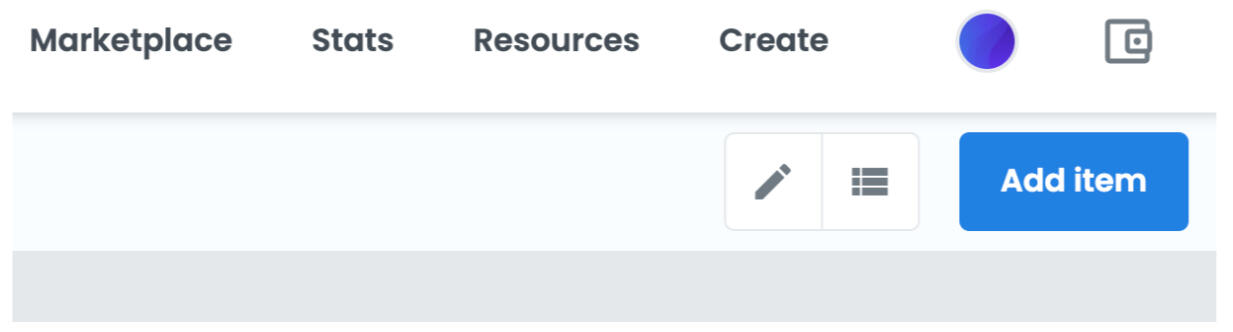
Step 9: You are automatically taken to your new Collection page.Now it is time to mint the actual course NFT! Click the “Add Item” button to get started
Step 10: [DEPRECATED INSTRUCTION] OPENSEA HAS SUPPLY FIELD AVAILABLE.
As you start, consider how many students you will mint this NFT for.NOTE: Since there is no option for multiples, you will need to add something to the URL. Otherwise you will only end up minting one NFT!In order to do this: BEFORE YOU START, Simply copy/paste the text below and add it to the very end of your URL:?enable_supply=true

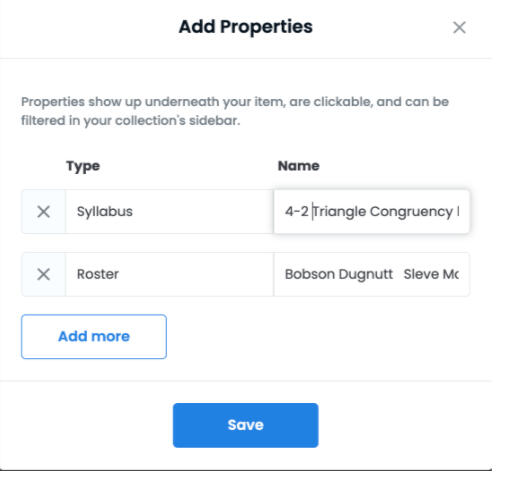
The page will update and create a field for “supply” or the amount of tokens you will mint. You will fill this number in later as you go through the page.Step 11: Minting the NFTBegin by uploading your already designed unique NFT image/fileName: Course Name (this may have the same title as another course. It does not need to be unique)External Link: If there is a Class page or other site, add a link. If class pages are not accessible or are deleted after the semester, then ignore.Description: This is an important input as this is part of the accountability and democratic credentialing process. Recommendations are to type the course name, the level, the amount of students on the roster, and then paste the content covered in addition to any key course deliverables. You may also paste the roster here as well.The other option is to utilize the Properties function to organize the roster and syllabus. To do so, click the plus and add a label to the Type and then paste the information in the Name field:
Supply field: type the amount of tokens you are making available. If you are making an NFT for each section of a course, keep your numbers in mind.Levels and Stats*: These are some other optional custom options, if you would like to use them.The key information for the ledger is what content was covered, what was required to complete the course, and the roster of students completing the course. Including student names are hopefully a temporary necessity until tokens are set to be transferred once and never again.Once everything looks good, go ahead and Create your Education NFT.
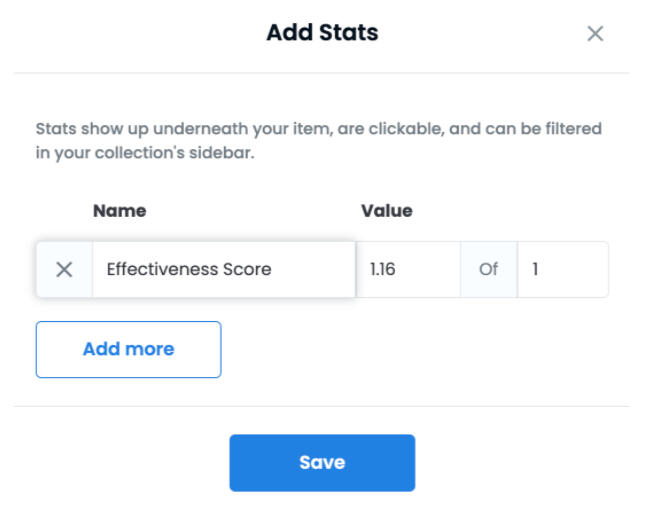
*SPECIAL NOTE ONLY FOR STUDENTS MINTING NFTS FOR A TEACHER OR INSTRUCTOR:If you are a student minting an NFT for a teacher, please click the “+” button in the Stats row. Type in “Effectiveness Score” or “Teacher Effectiveness Score” In the first box, type in the average score. This was by taking every student's anonymous vote worth a score of either 1.25, 1 or .75 (teacher exceeded syllabus, met syllabus, needs improvement on delivering syllabus). Add those scores and divide by the total number of students.
Then set the second box value to 1. It should always be out of 1 instead of 1.25, because 1 is the standard.
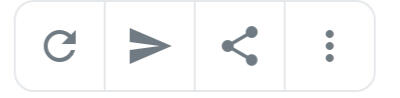
Step 12: Transferring NFTs to Students or from Students to Teacher.Carefully collect each students wallet address. MetaMask makes it easy to copy.If you are ready to transfer, select the paper plane icon (between refresh and share).
Opensea and MetaMask will guide you through the rest. The blockchain will take care of the transaction.
STUDENT STEPS TO RECEIVE NFT
Depending on the age of your students, parental permission may be required to set up a digital wallet. Making this optional is the safest move. You can still mint enough tokens for each student, and later down the road should they want their token, you can transfer it later no problem.Step 1: Students need to create a MetaMask account. Since you have already accomplished this you can walk them through it.Step 2: Students do not need to fund their wallet.Step 3: Students will need to give you their wallet address so you can begin transferring. The address is easily copyable from MetaMask.Step 4: After the NFT is transferred and on the blockchain, encourage students to show or share their NFT.
DISPLAY RECOMMENDATION
There is an app called rainbow.meIt acts as another wallet, but also has a very clean interface and way to "showcase" all the NFTs students have earned. We love this as an easy way to show all the completed courses and experiences. All the students need to do is transfer their MetaMask wallet using their 12 word phrase and then select the educations NFTs to "showcase"Note: This doesn't replace or remove MetaMask, you keep both.Students can easily share their NFT with a webpage or in the app!Here is an example of a Showcase page on the WebAs of publishing, Rainbow will have NFTs on Polygon showing shortly (so they say). The OpenSea app is your best bet to view Polygon NFTs on a smartphone.Here is great documentation from rainbow.me on how to transfer from MetaMask to Rainbow.